Creative Image Inside Text Effect | Photoshop Effect | Photoshop tutorial
- Deep Shah
- Dec 20, 2019
- 4 min read

Updated: Nov 6, 2022
Bored with normal texts in your life ? Well then learn this tutorial on how to create this Creative Image inside text effect in Photoshop and make your text look awesome . Creating this effect might look difficult but it is not , so follow the steps mentioned below and learn this effect in Photoshop . So let's get started!

Download Photoshop :- https://prf.hn/l/OVRDLJm
Equipment I use :-
Primary Laptop :- https://amzn.to/3BLqADZ
Secondary Laptop :- https://amzn.to/3wryYWo
Mouse :- https://amzn.to/3zsnuCH
Original Image Download Link :- https://www.pexels.com/photo/close-up-photography-of-leaves-with-droplets-807598/
Bebas Neue Font Download Link :- https://www.dafont.com/bebas-neue.font
Tutorial on How to Install font in Photoshop :- https://www.photoshop-tutorial.com/post/how-to-add-fonts-to-photoshop
Final Image PSD Download Link :- https://drive.google.com/open?id=1B4SDVnX_BpN2DW-RfmoNki-aSn4i3J9f
Youtube Video :-
Steps on how to create this Creative Image inside Text Effect in Photoshop :-
So the first step is to create a new file , so for that go to File and then select New over there and then in the pop up set the Width as 1280px , Height as 720px , Resolution as 300 px/inch and Background contents as White so this will fill the layer with White color and then click on OK


Now we need to fill the layer with nice Gradient color , so for that click on Create new fill or adjustment layer icon and select Gradient over there and then in the pop up set the Gradient as Black & White , Style as Radial , Angle as 90 deg , Scale as 500% , and tick on Reverse and then click on OK


Now we need to fill the layer with the text , so for that select Horizontal type tool and then select any font of your choice (But remember to choose a font which has thickness) and then set it's appropriate size and after that set the font color as any color by changing the foreground color


After that click on the image and then type in your text and after that click on the tick icon to place it


Then we need place the text at center of the image , so for that press CTRL and click on the background layer which will give you selection of both the layers i.e Text layer and Background layer

After that select move tool and then click on Align vertical centers icon and then click on Align horizontal centers so this will place the text at the center of the image


Now make the text layer active by clicking on it and then bring in the image you want to place inside text over here


After that we need to scale and move this image so that it look perfect inside the text , so for that reduce the opacity of the image to 50% and after that scale (Press SHIFT while scaling to scale evenly) and move the image to place it properly over text and then tick on tick icon to place it


Then increase the opacity of image back to 100%

Now right click on the image layer and then select create clipping mask over there which will only keep the image that is over the text and will hide the rest of the image


Then press CTRL + J to create a duplicate of this Image , which will again cover up the whole text as early without clipping mask


Now over here we need to select parts of the image that we want to come out of text using Quick selection tool , so for proper selection reduce the opacity of the image to 50% and then select Quick selection tool and then using it select the parts of the image (Note : You can press ALT and click to deselect a selection)


After that click on Add layer mask icon which will only keep selection and hide the rest of the image and then increase the opacity back to 100%


Now we need to add border around text and some shadow inside of the text , so for that make the text layer active by clicking on it and then click on Add layer style icon and select Blending options over there


Then in the pop up select stroke and then set the following , Size : 8px , Position : Outside , Blend mode : Normal , Opacity : 100% , Color : White

After that click on Inner shadow and set the following , Blend mode : Multiply , Opacity : 75% , Angle : 120 deg , Distance : 5px , Choke : 3% , Size : 10px and then click on OK


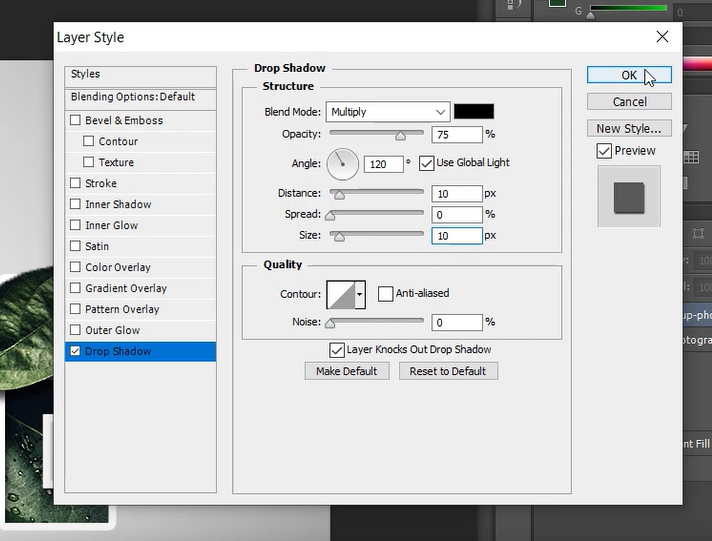
Now we need to add shadow to parts of the image that are coming out of the text , so for that make the top layer active by clicking on it and then click on Add layer style icon and then select Blending options over there

Then in the pop up click on Drop shadow and then set the following , Blend Mode : Multiply , Opacity : 75% , Angle : 120 deg , Distance : 10px , Spread : 0% , Size : 10px and then click on OK

Now I want to set the background color some what similar to that of image color , so for that make the Gradient layer active by clicking on it and then create a new layer by clicking on Create new layer icon


Now set the foreground color as any color from the image , so I will set the color as shade of Green as my image fill with that color

Then using Paint bucket tool fill the layer with that color


After that reduce the opacity of the layer to 15%

So this will give you your Creative Image inside text effect in Photoshop!
So that's it guys!
Now if you guys liked this tutorial that hit the like button also share it to the ones who might be interested in such tutorials and subscribe to Website so that you never miss any new tutorial!
Happy Learning!
Youtube Video :-
Related :-
Bend 3D Text Effect in Photoshop :- https://www.photoshop-tutorial.com/post/bend-3d-text-effect-in-photoshop
Smoke Text Effect in Photoshop :- https://www.photoshop-tutorial.com/post/bend-3d-text-effect-in-photoshop
Powder Blast Text Effect in Photoshop :- https://www.photoshop-tutorial.com/post/powder-blast-text-effect-in-photoshop
Transparent Text Effect in Photoshop :- https://www.photoshop-tutorial.com/post/transparent-text-effect-in-photoshop
Powerful Text Wrap Portrait Effect in Photoshop :- https://www.photoshop-tutorial.com/post/powerful-text-wrap-portrait-effect-in-photoshop


This was a lovely blog post