Bend 3D Text Effect in Photoshop | Text Manipulation | Photoshop Tutorial
- Deep Shah
- Dec 10, 2019
- 4 min read
Updated: Nov 6, 2022
In this tutorial , you will learn how to create this awesome Bend 3D Text Effect in Photoshop. Creating such effect might look a bit difficult but it is not so just follow the steps mentioned below and learn how to create it for yourself . So let's get started!
Download Photoshop :- https://prf.hn/l/OVRDLJm
Equipment I use :-
Primary Laptop :- https://amzn.to/3BLqADZ
Secondary Laptop :- https://amzn.to/3wryYWo
Mouse :- https://amzn.to/3zsnuCH
Landscape Top Photo Download Link :- https://www.pexels.com/photo/alone-animal-bird-clouds-395196/
Landscape Bottom Download Link :- https://www.pexels.com/photo/alone-beach-calm-dawn-396947/
Bebas Neue Font Download Link :- https://www.dafont.com/bebas-neue.font
How to Install Font in Photoshop :- https://www.photoshop-tutorial.com/post/how-to-add-fonts-to-photoshop
Final Text PSD Download Link :- https://drive.google.com/open?id=14sO_vZ6tUB1yKqhuXj6Cm3LWjoIVIaWR
Youtube Video :-
Steps on how to create this Bend 3D Text Effect in Photoshop :-
So the first step is to create a new file , so for that go to File and then select New over there and then in the pop up set the Width as 1280px , Height as 720px , Resolution as 300 px/inch and Background contents as White so this will fill the layer with White color and then click on OK


Now we need to fill the layer with nice Gradient color , so for that click on Create new fill or adjustment layer icon and select Gradient over there and then in the pop up set the Gradient as Blue , Yellow , Blue , Style as Radial , Angle as 90 deg , Scale as 220% , and tick on Reverse and then click on OK


After that reduce the opacity of the layer to 15% so this will give you nice Gradient color to the layer


Now go to View and then select New guide over there and then in the pop up set the orientation as Horizontal and then position as 50% and then click on OK


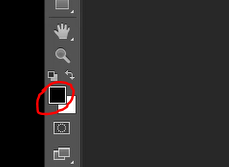
Now select Horizontal text tool and then select any font of your choice and then set it's appropriate size and then set the foreground color as black which will be the font color


Now click on the Image and then type in your Text and then click on the tick icon


After that place the text properly using Move tool


Then press CTRL + T and scale the text accordingly , press SHIFT while scaling to scale evenly and then click on Tick icon

Now press CTRL and click on the background layer which will select the background layer keeping the text layer also selected

Now make sure that MOVE tool is selected and then click on Align vertical centers and then click on Align horizontal centers which will bring the text in the center of the Image


Now make the text layer active by clicking on it and then right click on the layer and select Rasterize type over there


Then select Rectangular marquee tool and then using it make the selection from Grid line to the bottom of the image as follows


After that right click over there and then select Layer via Cut in the pop up


Now rename the Top layer as Bottom and the layer below it as Top

Now make the top layer active by clicking on it and then press CTRL + T

After that right click on the layer and select Perspective over there and then change the angle of the text by 30 deg by dragging from the top corner as follows


Then again right click over there and then select Scale and then reduce the height of the text a little and then click on tick icon


Now make the bottom layer active by clicking on it and then press CTRL + T

After that right right click on the image and select Perspective over there and then change angle of the text by -10 deg by dragging from corner


Then again right click on the image and then select Scale over there and then increase the height of text a little and then click on tick icon


Now make sure that the bottom text layer is active and then bring in the image you want to add to the bottom text over here and then click on the tick icon

Then right click on the image layer and select create clipping mask over there which mask the image inside the text


After that press CTRL + T and then scale the image to fit in the text properly and press SHIFT and scale to scale the image evenly and then click on the tick icon

Now make the top text layer active and then repeat the same steps you did for Bottom text


Now create a new layer by clicking on create new layer icon


After that select brush tool and brush s soft round and set the size of the brush as 40px and then set the foreground color as white


Then press SHIFT and then click and hover over the Grid line using brush tool as follows

Now right click on the new layer and select Create clipping mask over there


After that reduce the opacity of the layer to 50%


Now make the image of the bottom text layer active by clicking on it and then create a new layer by clicking on create new layer icon


After that select the foreground color as black and then using brush tool press SHIFT and then click and then hover over the grid line as follows


Then right click on the layer and select Create clipping mask over there and then reduce the opacity of the layer to 50%


Now we need to add shadow to make the text more realistic so for that make the bottom text layer active by clicking on it and then right click over there and select Blending options


After that in the pop up select Drop shadow and then set the following , Blend mode as Multiply , Opacity as 75% , Angle as 120 deg , Distance as 5px , Spread as 0% , Size as 10px and then click on OK

Now make the top text layer active and then do the same thing as we did for bottom text layer to add shadow , so this will give you your final Bend 3D Text Effect in Photoshop

So that's it guys!
Now if you guys liked this tutorial then hit the like button also share it to the ones who might be interested in such tutorials , also subscribe to never miss such tutorials in Photoshop!
Thank You!
Youtube Video :-
Related Tutorials :-
Creative Text Inside Image in Phtoshop :- https://www.photoshop-tutorial.com/post/creative-image-inside-text-effect
Smoke Text Effect in Photoshop :- https://www.photoshop-tutorial.com/post/bend-3d-text-effect-in-photoshop
Powder Blast Text Effect in Photoshop :- https://www.photoshop-tutorial.com/post/powder-blast-text-effect-in-photoshop
Transparent Text Effect in Photoshop :- https://www.photoshop-tutorial.com/post/transparent-text-effect-in-photoshop
Powerful Text Wrap Portrait Effect in Photoshop :- https://www.photoshop-tutorial.com/post/powerful-text-wrap-portrait-effect-in-photoshop


Comments