Fence Effect | Photoshop Effect | Photoshop Tutorial
- Deep Shah
- Dec 17, 2019
- 3 min read

Updated: Nov 6, 2022
Learn how to give this awesome Fence effect to your photos in Photoshop and shock you friend and family member with it , also creating such effect might look difficult to create but , it is not . So just follow the steps and learn how to give this Fence effect in Photoshop

Download Photoshop :- https://prf.hn/l/OVRDLJm
Equipment I use :-
Primary Laptop :- https://amzn.to/3BLqADZ
Secondary Laptop :- https://amzn.to/3wryYWo
Mouse :- https://amzn.to/3zsnuCH
Original Image Download Link :- https://www.pexels.com/photo/woman-wearing-coat-762020/
Fence Image PNG Download Link :- https://www.pngguru.com/free-transparent-background-png-clipart-nrkva
Final Image PSD Download Link :- https://drive.google.com/open?id=1NPC9ZdZWyErJ2OdM6RQyZuSUkfdbz7_4
Youtube Video :-
Steps on how to give this awesome fence effect to your Photos in Photoshop :-
So the first step is to create a duplicate of this image by pressing CTRL + J

Now hide the duplicate for now by click on the eye icon and then make the background layer active by clicking on it


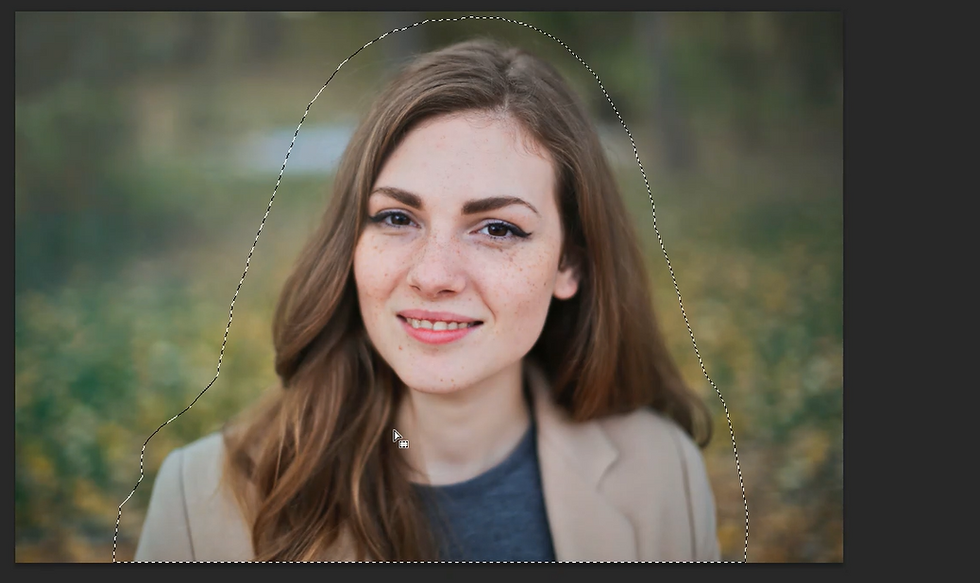
Then select Lasso tool and then using the tool make selection around model as follows , make sure the selection covers whole model

After that right click over there and then select Fill option and then in the pop set use as content-aware and then click on OK , so this will fill the selection with same as that of background


Now press CTRL + D to deselect the selection

Then press CTRL + J to create a duplicate of the image and then rename that layer to blur

After that go to Filter and then blur and then select Field blur over there and set the blur according to the image and then click on OK(Note : My background is already blurred so I am not blurring it anymore)


Now make the duplicate layer active by clicking on it and then unhide the layer by clicking on eye icon

Then using Quick selection tool select the model in image (Note : Press ALT and then click and hover the selection to deselect it )


After that click on Refine edge and then using brush hover over the edges to smooth out the selection at edges and then click on OK


Then click on Add layer mask icon which will only keep the selection and remove rest of background , so this will give you 2 separate layers one layer of complete background and other layer with model only


Now if you want to scale the model in image then press CTRL + T and then scale it by pressing SHIFT to scale evenly and then click on tick icon


Now bring in Fence image over here and then scale fence image so that it fits the whole image also while scaling press SHIFT and scale to scale it evenly and click on the tick icon to place it


Then make the mask of the model layer active by clicking on it

Now select brush tool and brush as Hard round and then make the foreground color as black


Now using brush tool click and hover over any square of fence , so this will remove the model image and keep the background image as you hover that part as follows

So like this way remove model image from appropriate square so that it looks good (Note 1 : Press CTRL + Z to go a step back , Note 2 : Use square brackets of your keyboard to increase and decrease the size of the brush )

Now make the top layer active and then click on Create new layer icon to create a new layer at the top


Now change the brush of the brush tool as Soft round and make sure that foreground color is black and then using brush hover over the image as follows


After that right click on the layer and select Create clipping mask over there , so this will keep the black color on the fence only


Then reduce the opacity of the layer to 35%

So this will give you your Fence effect in Photoshop!
So that's it guys!
Now if you guys liked this Photoshop tutorial then hit the like button , also share it to the ones who might be interested in such videos !
And subscribe to the blog to never miss out on such awesome Photoshop tutorials and Photoshop effects!
Youtube Videos :-


Comments