Half Sketch Effect in Photoshop | Photoshop Effect | Photoshop Tutorial
- Deep Shah
- Oct 26, 2019
- 2 min read
Updated: Nov 6, 2022
In this tutorial , you will learn how to give this Half sketch effect to your photos in Photoshop. So just follow the steps and learn this easy method to create it for yourself . So let's get started!

Download Photoshop :- https://prf.hn/l/OVRDLJm
Equipment I use :-
Primary Laptop :- https://amzn.to/3BLqADZ
Secondary Laptop :- https://amzn.to/3wryYWo
Mouse :- https://amzn.to/3zsnuCH
Original Image download link :- https://www.pexels.com/photo/beauty-model-in-colorful-makeup-838875/
Torn Paper image download link :- https://images.app.goo.gl/w21WpPaPyYstWVJL9
Final Image PSD Download Link :- https://drive.google.com/open?id=1j_FxcEnLebprRrq6b91iE-H5n5XDTymF
Youtube Video :-
Steps on how to give this Half sketch effect to your photos in Photoshop :-
So the first step is to create a duplicate of the image by pressing CTRL + J

After that go to Image and then adjustments and then select Black and White over there and then in the pop up keep everything to default and then click on Ok which will convert the Image into a Black and white Image

Now right click on the duplicate layer and select Convert to smart object over there


Then go to Filter and then select Filter gallery over there

After that expand Artistic folder and select Colored pencil over there and then set the following , Pencil Width : 8 , Stroke pressure : 7 , Paper brightness : 50 and then on Ok

Now make the original image layer active by clicking on it

Then press CTRL + J to create a duplicate of it

After that drag that layer to the top

Now click on Add layer mask icon

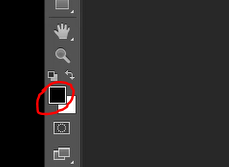
Now make the foreground color as black and then select Brush tool and brush as Soft round


After that using brush click and hover over the right half of the image to remove it (Shortcut to increase and decrease size of brush:- Press [ to reduce the size of the brush and ] to increase it's size )

Now open any torn paper image in a new tab

Then select only torn paper using Magic wand tool or quick selection tool


After that press CTRL + C to copy the selection and then go to Original image tab and press CTRL + V to place it over there

Now press CTRL + T and then rotate and scale the paper image to half part of the layer


Then right click on the layer and select create clipping mask over there


Now click on Add layer icon and select Blending options over there


Then in the pop up click on Drop shadow and set the following , Blend mode : Multiply , Opacity : 75% , Distance : 10px , Spread : 10% , Size : 20px and then click on Ok

So now this will give you your Half sketch effect in Photoshop!

So that's it guys! So now if you guys liked this tutorial then hit the like button also share it to the ones who might be interested in such tutorials!
Youtube Video :-


Comments